
Responses
A response is what the server sends back: a status code, a body and optional headers. Every endpoint has at least one. This page goes through each field on the response card.
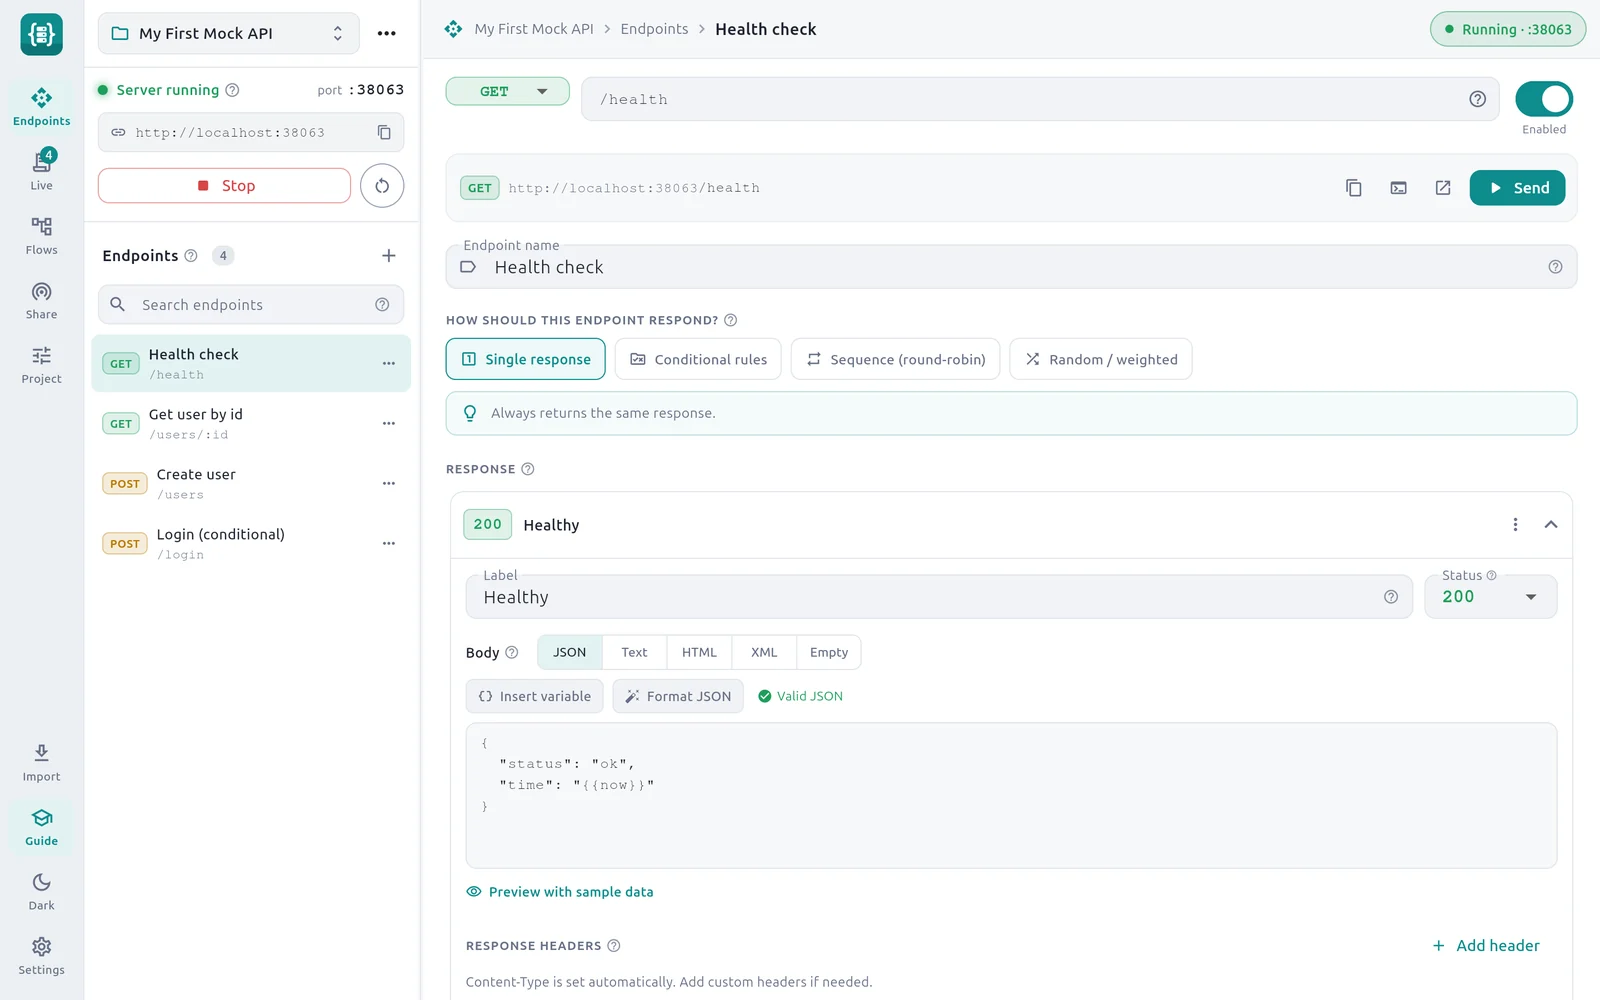
- 1Status chip — The status code, shown even when the card is collapsed.
- 2Collapse — Hides the settings. Clicking the header does the same.
- 3Label — A name for this response, shown in the Live log.
- 4Status — The HTTP status code to send.
- 5Body type — JSON, Text, HTML, XML or Empty.
- 6Format JSON — Re-indents the body when it is valid JSON.
- 7JSON check — Valid JSON or Invalid JSON, updated as you type.
- 8Preview with sample data — Shows the body with placeholders filled in.
Label
Label is a name for the response, such as Success or Not found. Clients never see it. It appears on the card's header and in the Live section, next to the endpoint name, so you can tell which response a request received. Good labels matter most when an endpoint has several responses.
Status
Status is the HTTP status code. Choose one from the list:
| Code | Meaning |
|---|---|
200 | OK |
201 | Created |
204 | No Content |
400 | Bad Request |
401 | Unauthorized |
403 | Forbidden |
404 | Not Found |
409 | Conflict |
422 | Unprocessable Entity |
429 | Too Many Requests |
500 | Internal Server Error |
502 | Bad Gateway |
503 | Service Unavailable |
Hover a code in the list to read what it means. Codes from 200 to 299 mean success, 400 to 499 mean a problem with the request, and 500 to 599 mean a server error. HTTP basics explains status codes in more detail.
A response created by an import can carry a code that is not in this list. The field shows that code, and it stays until you choose another.
Body type
The buttons beside Body set the kind of content. The type also sets the Content-Type header.
| Body type | Content-Type sent | Use for |
|---|---|---|
| JSON | application/json | API data. The editor checks it as you type. |
| Text | text/plain | Plain, unformatted text. |
| HTML | text/html | A web page, shown as a page when opened in a browser. |
| XML | application/xml | XML data, for older or SOAP-style APIs. |
| Empty | none | No body and no Content-Type. Use it with 204. |
Body
Type or paste the content in the editor. For JSON, a marker reads Valid JSON or Invalid JSON, and a line under the editor names the problem. Placeholders such as {{params.id}} count as values, so this body is accepted even though it is not strict JSON until the placeholder is filled in:
{
  "id": {{params.id}},
  "name": "{{faker.name}}"
}
Good to know
The JSON check is a helper, not a gate. The server sends whatever is in the editor, so a body marked Invalid JSON is still sent as it is.
If you are new to JSON, see JSON basics.
Insert variable
Insert variable opens a list of placeholders and adds the one you choose at the cursor. Each time the response is sent, the placeholder is replaced with data from the request or a generated value.
| In the list | Replaced with |
|---|---|
{{params.id}} | A value from the URL path |
{{query.page}} | A query-string parameter |
{{header.Authorization}} | A request header |
{{body.email}} | A field from the JSON request body |
{{uuid}} | A random unique id |
{{now}} | Current time (ISO 8601) |
{{timestamp}} | Current unix timestamp |
{{randomInt(1,100)}} | A random number in a range |
{{faker.name}} | A random full name |
{{faker.email}} | A random email address |
{{faker.city}} | A random city |
{{faker.company}} | A random company name |
After inserting one, change the name to suit your endpoint: {{params.id}} becomes {{params.orderId}} for the path /orders/:orderId. The list is a starting point; Dynamic templating has every token.
Format JSON
Format JSON re-indents the body so it is easier to read. It is shown for the JSON body type and works only while the marker reads Valid JSON.
Preview
Select Preview with sample data under the editor to see the body with placeholders filled in. Select Hide preview to close it.
The preview uses a made-up request, not a real one:
| Placeholder kind | Sample value |
|---|---|
Path parameter id | 42 |
Wildcard wildcard0 | sample |
Query page and limit | 1 and 20 |
Header Authorization | Bearer sample-token |
| Body | {"name":"Sample","email":"sample@example.com"} |
A placeholder that the sample request has no value for, such as {{params.orderId}}, stays as typed in the preview. To see the real result, send a request with the built-in tester.
Response headers
Under Response headers, select Add header, then fill in Header name and Value. Select the remove button on a row to delete it.
Content-Typeis set from the body type. Add your ownContent-Typeheader only when you need a different one, for exampleapplication/problem+json.- Header values can use placeholders. A header
X-Request-Idwith the value{{uuid}}sends a new id on every reply. - Header names are not case-sensitive.
The project can also add headers to every response, and adds CORS headers when CORS is on. See Auth, CORS and project settings.
Delay override and fault injection
Lower on the card:
- Delay override (ms) makes this one response wait a set time, instead of the endpoint's base delay. Leave it blank to use the endpoint's setting.
- Fault injection makes this response fail on purpose: drop the connection, send an empty or malformed body, or hang.
Both are covered in Latency and faults.
Add, duplicate and delete responses
- With Single response selected, the link under the card reads Add another response (switches to conditional rules). It adds a second response with status
400and changes the strategy to Conditional rules. - With any other strategy, select Add response at the top right of the responses section.
- Open the ⋮ menu on a card to Duplicate it. Delete is offered when the endpoint has more than one response.
How the endpoint chooses between several responses depends on the strategy. See Response strategies.