
Your first mock API
In about ten minutes you will start a mock server, call it three different ways, add an endpoint of your own and make its reply change with each request.
What you need
- Mock Studio installed. See Install.
- A web browser.
- Optional: a terminal with
curl. If you have never used one, Your first API call explains it.
You do not need to know how to code. If a word such as endpoint, method or status code is unfamiliar, the glossary has short definitions.
1. Start the sample project
When Mock Studio opens for the first time it creates a project called My First Mock API with four endpoints.
Open Mock Studio.
In the side panel, select Start server.
A message says
Server started on port 8080. The card now reads Server running and the pill at the top right reads Running · :8080.
Your computer is now answering HTTP requests at http://localhost:8080. localhost means "this computer", and 8080 is the port, the number that tells the computer which program a request is for.
TIP
If you see Port 8080 is already in use. Pick another port., another program has that port. Open Project in the rail, change Port to 8081, and start again. Use your port in place of 8080 in the rest of this page.
2. Call an endpoint with the built-in tester
In the endpoints list, select Health check.
The editor shows its method, GET, and its path,
/health.In the row that shows
http://localhost:8080/health, select Send.
The response appears under the row: the status 200, the time it took in milliseconds, and the body.
{
  "status": "ok",
  "time": "2026-11-09T06:30:25.412345Z"
}
200 is the status code for success. The time value is the current time: the body in the editor contains "time": "{{now}}", and Mock Studio replaces {{now}} each time it answers. Press Send again and the time changes.
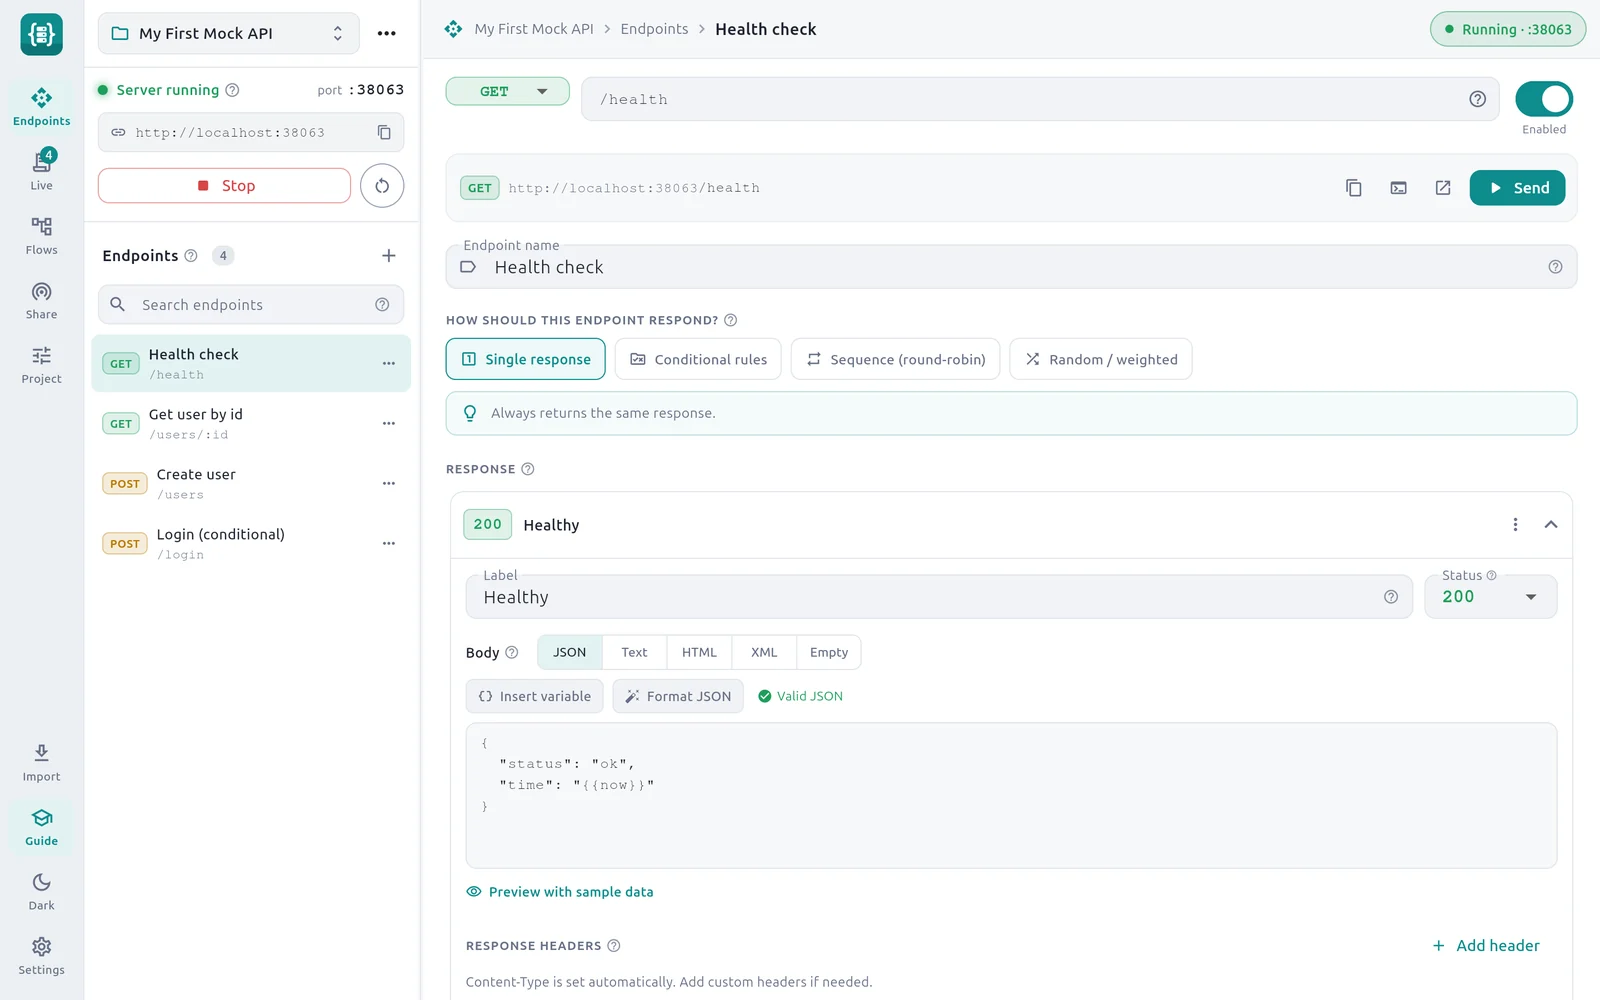
- 1Health check — The endpoint you are editing.
- 2Test URL — The full address of this endpoint on your computer.
- 3Send — Sends a real request to the running server.
- 4Placeholder — The now token is replaced with the current time in every reply.
3. Call it from a browser
The mock is a real server, so anything on your computer can call it.
In the test row, select Open in browser (the icon with an arrow leaving a box).
Your browser opens
http://localhost:8080/healthand shows the same JSON.In the browser's address bar, change the address to
http://localhost:8080/users/42and press Enter.
You get a made-up user whose id is 42. That reply comes from the Get user by id endpoint. Its path is /users/:id. The :id part matches any single value, and the body uses "id": "{{params.id}}" to send the value back. Reload the page and the name, email and city change, because they are placeholders such as {{faker.name}}.
4. Call it with curl
Open a terminal and run:
curl http://localhost:8080/healthThe JSON prints in the terminal. Now try an endpoint that reads the request body. The sample Login (conditional) endpoint returns a token only for the right password:
curl -X POST http://localhost:8080/login \
  -H 'Content-Type: application/json' \
-d '{"password": "secret"}'{
"token": "0b6c1d0e-5c0f-4a8e-9d0b-2f6a3c1e7b9a",
"expiresIn": 3600
}Change secret to anything else and run it again. The reply is now status 401 with {"error": "invalid_credentials"}. Add -i to the command to see the status line. Conditional rules explains how that endpoint decides.
5. Add your own endpoint
In the side panel, select + beside Endpoints (its tooltip is New endpoint).
In Add an endpoint, select Blank endpoint.
A new endpoint named New endpoint appears, with the method GET and the path
/hello.Change Endpoint name to
List books.Change the path from
/helloto/books.In the response card, change Label to
Two books.Replace the text in the body editor with:
json{ "requestId": "", "books": [ { "id": 1, "title": "Dune" }, { "id": 2, "title": "Emma" } ] }The marker beside Format JSON reads Valid JSON. If it reads Invalid JSON, the line under the editor says what is wrong, usually a missing comma or quote.
Select Send in the test row.
The response shows status 200, an empty requestId and your two books. You did not save or restart anything: Mock Studio saves as you type, and a running server uses the change on the next request.
6. Make the reply dynamic
In the body editor, click between the two quotes after
"requestId":.Select Insert variable, then choose
{{uuid}}from the list.The line now reads
"requestId": "{{uuid}}",.Select Preview with sample data under the editor to see the body with the placeholder filled in.
Select Send twice.
Each reply has a different requestId. Dynamic templating lists every placeholder.
7. Watch the requests arrive
Select Live in the rail. Every call you made is listed, newest first, with its status, method, path, the endpoint that answered and how long it took. Select a row to see its headers and bodies.
Try http://localhost:8080/nothing in your browser. A row appears with status 404 and a no match tag: no endpoint has that path. See Live request log.
8. Stop the server
Select Stop in the side panel, or click the Running pill at the top right. The address stops answering until you start the server again. Your endpoints are kept.
Check yourself
Question 1 of 6
You select Start server and see this message. What do you do?
Port 8080 is already in use. Pick another port.What you learned
- A project is a set of endpoints served on one port.
- An endpoint is a method plus a path, with one or more responses.
- Start server makes the mock reachable at
http://localhost:followed by the port. - You can call the mock from the built-in tester, a browser,
curlor your own app. - Placeholders in double braces are replaced for each request.
- The Live section shows what was actually called.
Next steps
- Endpoints and paths: methods,
:id,*and**. - Response strategies: return different replies from one endpoint.
- Latency and faults: make the mock slow or broken on purpose.
- Share on LAN or the internet: call the mock from your phone.