
Beginner guide
In about ten minutes you open a repository, learn what each part of the window shows, and record your first commit.
A two-minute introduction to Git
Git keeps the history of a folder of files. A few words come up on every screen:
- A repository is a folder that Git tracks. It contains a hidden
.gitfolder with the history. - A commit is a saved snapshot of your files, with a message that says what changed.
- The working tree is the files as they are on disk right now, including edits you have not saved into a commit yet.
- Staging is choosing which edits go into the next commit. Staged changes wait in a holding area (Git calls it the index) until you commit.
- A branch is a movable name that points at a commit. You work on a branch, and it moves forward each time you commit.
- A remote is a copy of the repository somewhere else, usually on a server such as GitHub.
What you need
- BranchPilot installed. See Install.
- A Git repository on your computer.
BranchPilot opens repositories that already exist. It does not clone or create them. If you do not have one yet, make a practice repository in a terminal:
mkdir ~/practice-repo
cd ~/practice-repo
git init
git config user.name "Your Name"
git config user.email "you@example.com"
echo "My first file" > notes.txt
git add notes.txt
git commit -m "Add notes"
To work on a project that lives on a server, clone it in a terminal with git clone followed by the project's address, then open the folder it creates.
Open a repository
Start BranchPilot. The welcome screen shows an Open repository… button.
Select Open repository… and choose the repository folder. Any folder inside the repository works: BranchPilot finds the top of the repository for you.
The repository opens in a tab.
If the folder is not tracked by Git, BranchPilot shows Not a git repository: followed by the path, and nothing opens.
Next time, the repository is listed under RECENT on the welcome screen. Select it there to open it again. To open a second repository beside the first, use the plus button at the right end of the tab bar (Open another repository).
Find your way around
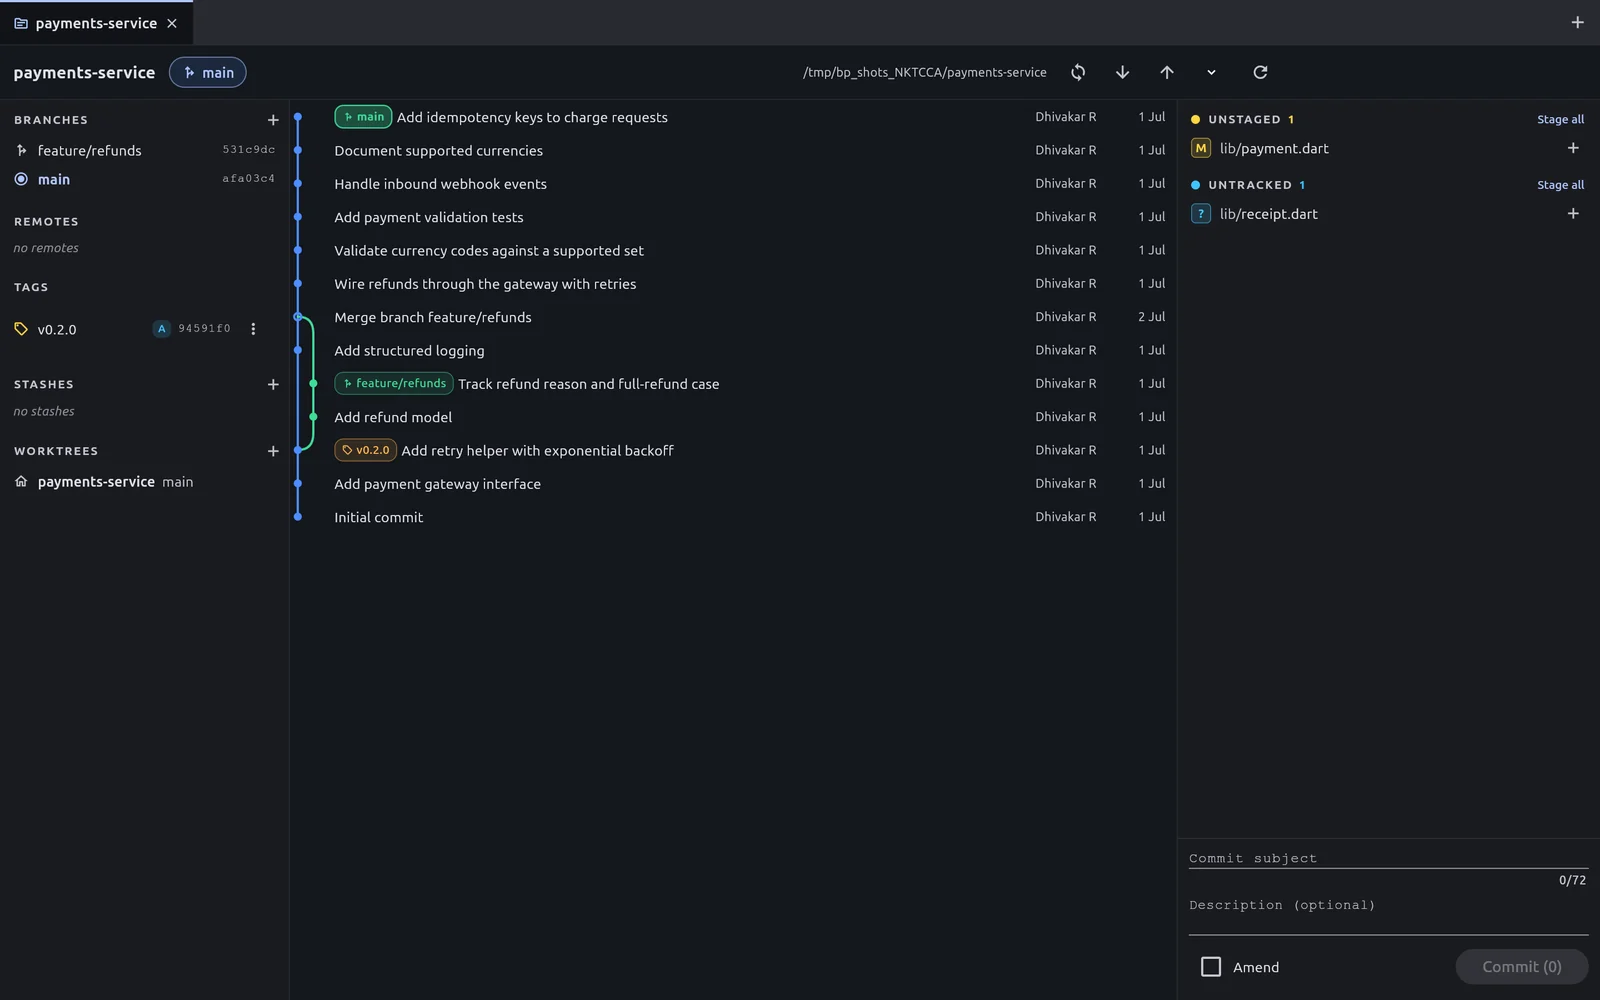
- 1Current branch — The branch you are on.
- 2Fetch, pull and push — Exchange commits with the remote.
- 3Sidebar — Branches, Remotes, Tags, Stashes and Worktrees.
- 4Commit graph — The history, newest commit on top.
- 5Changes — Edited files waiting to be staged or committed.
- 6Commit box — The message and the Commit button.
- The sidebar on the left lists Branches, Remotes, Tags, Stashes and Worktrees. The branch you are on is highlighted.
- The commit graph in the middle shows one commit per row: its message, author and date. Coloured labels mark where branches and tags point. Lines on the left show how branches split and join.
- The changes panel on the right lists files that differ from the last commit. When nothing has changed it says Working tree clean.
- The commit box sits under the changes panel.
Select any commit in the graph to see its details on the right: the full message, author, date and the files it changed. Select a file there to see what changed in it. Close the details to get the changes panel back.
Make your first commit
Change a file in the repository with your usual editor and save it. For the practice repository, add a line to
notes.txt.Look at the changes panel. The file appears under Unstaged with an
Mbadge (modified). A brand-new file appears under Untracked with a?badge. BranchPilot notices changes on disk by itself; you do not need to refresh.Select the file. The middle of the window switches from the graph to the diff: removed lines in red, added lines in green.
Select Stage file above the diff. The file moves to Staged. It is now part of the next commit.
In the commit box, type a short summary in Commit subject, for example
Add a second note. The counter shows how many of the recommended 72 characters you have used. Description (optional) is for a longer explanation.Select Commit (1). The number is how many files are staged. Ctrl + Enter does the same.
The changes panel returns to Working tree clean, and your commit appears at the top of the graph with the branch label next to it.
Good to know
If the commit fails with a message about your identity, Git does not know your name and email yet. Set them as shown on the Install page, then commit again.
Send your commit to the server
Skip this part if your repository has no remote (the Remotes section says no remotes).
Select the fetch button in the header, or press F5. Fetching downloads news from the server without changing your files.
If the pull button shows that you are behind, select it to bring the new commits into your branch.
Select the push button to upload your commit.
Progress appears in a strip with the real output from Git. More detail is in Fetch, pull and push.
What you learned
- A repository opens in a tab, with the sidebar, commit graph, changes panel and commit box around it.
- Edits show up under Unstaged or Untracked. Staging picks what goes into the next commit.
- A commit needs something staged and a subject.
- Fetch, pull and push exchange commits with a remote.
Next steps
- Stage changes and commit: stage part of a file, amend a commit.
- Branch and merge
- Fetch, pull and push
- Shortcuts and reference